
In this two-part series, I want to take a functional approach to building React applications.
There will be mathematical theory sprinkled throughout the series, and hopefully by the end of it you will pick up some useful techniques!
Series contents:
- Part 1 - Deconstructing the React Component
- Part 2 - The Reader monad and read-only context
In the previous post, we looked at React
through a more functional lens and rebuilt parts of the React component by using a View
box that contains the computation Props -> Element.
There are two remaining React component API that I want to replicate: context and state. And in this post we will learn how to add a read-only context for our application using yet another box object.
So onwards and upwards!
Motivation behind context
Say that we have a copyright notice View as follows.
const copyrightNotice = View(({ author, year }) => (
<p>© {author} {year}</p>
))
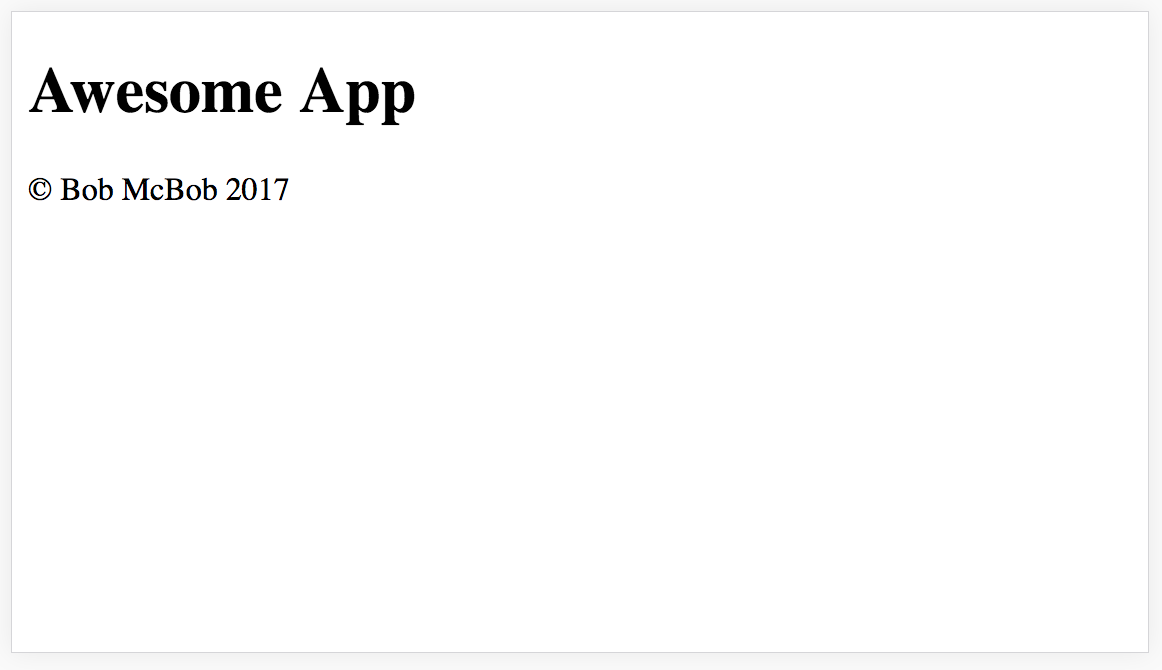
copyrightNotice.fold({ author: 'Bob McBob', year: 2017 }) // <p>© Bob McBob 2017</p>In order for this View to be used in our application, we will need to pass the props author and year down from the root View.
As the number of props grow in the application, the more data we will have to manually pass down. Not only is this a tedious process, but it also means that the root View will need to take in every single prop as its own input just so they can be passed down to descendents.
But wait, there is a better way!
Meet the Reader
Let’s start by defining a new Reader box that contains a computation of the type Context -> a. What is a here?
It really could be anything, but for now we can focus on computations that return a View.
The Reader defines one function runReader that takes in the value of the context, and returns the result of the
computation.
const Reader = computation => ({
  runReader: ctx => computation(ctx)
})
Now, we can use the Reader like this.
const footer = Reader(({ author, year }) =>
  copyrightNotice.contramap(() => ({ author, year }))
)

footer
  .runReader({ year: 2017, author: 'Bob McBob' })
  .fold() // <p>© Bob McBob 2017</p>
Here, the Reader’s computation returns a View, which is our previously defined copyrightNotice,
that has its input props contramapped from the Reader context. So, when we run the reader with a context value,
we get the value (View) out of the box, which we can fold down to get the final element.
Take a moment to let that sink in.
Now, just like we did with View previously, we can make the Reader a pointed functor.
const Reader = computation => ({
  runReader: ctx => computation(ctx),
  map: f => Reader(ctx => f(computation(ctx)))
})

// Running this reader will just return `x`.
Reader.of = x => Reader(() => x)
Then, we can use map to wrap the notice with a <footer> tag.
import { map } from 'ramda'

// We have to map twice since the first map is over the Reader,
// and the second map is over the View.
const footer2 = footer.map(map(y => <footer>{y}</footer>))

footer2
 .runReader({ year: 2017, author: 'Bob McBob' })
 .fold() // <footer><p>© Bob McBob 2017</p></footer>
But what else can Reader hold?
Remember that the Reader contains the computation Context -> a, where a can be anything?
So far we’ve returned a View from the computation, but it can really be any value, even a function!
Let’s look at a function that changes the color of an element within a View.
const makeColor = ({ color }) => view => view.map(element =>
  <div style={{ color }}>{element}</div>
)
We can wrap this up in a Reader.
const withColor = Reader(makeColor)To use this Reader, we need to run it with a context, then apply it to an element in the View.
// Get the color function inside withColor
const colorize = withColor.runReader({ color: 'red' })

// Get the view inside footer2
const footerView = footer2.runReader({ year: 2017, author: 'Bob McBob' })

// Run the view through the function, which returns another view.
const result = colorize(footerView)

// Fold to get the element out
result.fold() // <div style={{ color: 'red' }}}><footer><p>© Bob McBob 2017</p></footer></div>
Rather tediously, we have to run both readers before can apply the colorize function to the footer view.
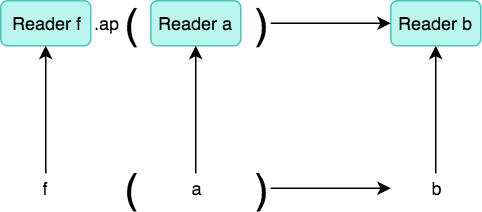
Of course, there is a better way to do this. And that is with the ap function.
const Reader = computation => ({
  runReader: ctx => computation(ctx),

  map: f => Reader(ctx => f(computation(ctx))),

  ap: other => Reader(ctx => {
    const fn = computation(ctx)
    return fn(other.runReader(ctx))
  })
})
The ap of a Reader will call its resulting function with the resulting value of another
Reader. We can visualize this like so.
This means that we can simplify our usage of withColor to this.
// Apply the result from footer2 to the result of withColor.
const x = withColor.ap(footer2)

// We only need to run the Reader once with a shared context.
x.runReader({
  color: 'red',
  year: 2017,
  author: 'Bob McBob'
}).fold() // <div style={{ color: 'red' }}}><footer><p>© Bob McBob 2017</p></footer></div>
A bit of theory: The Reader is now an Applicative in addition to being a functor.
An Applicative A must obey the following laws.
- Identity:
A.of(x => x).ap(v) === v - Homomorphism:
A.of(f).ap(A.of(x)) === A.of(f(x)) - Interchange:
u.ap(A.of(y)) === A.of(f => f(y)).ap(u)
For the Reader just substitute A with Reader in the above laws.
We can verify that these laws do indeed hold in this test.
Chaining the Reader context
Let’s consider another view for displaying the page title.
const pageTitle = View(({ title }) => <h1>{title}</h1>)Now, say we want to read the title from the context, just like we did for the copyright notice.
const header = Reader(
  ({ title }) => pageTitle.contramap(() => ({ title }))
).map(map(x => <header>{x}</header> )) // Wrapping title with <header>
                                      // Remember that we have to map twice,
                                      // first over the Reader, then over the View.
But, how can we use both the header and footer2 together? Maybe we map over the View inside
the header?
const combined =
  // Map over the view inside header
  header.map(headerView => (
    // Then map over the view inside footer
    footer2.map(footerView => (
      // Concat both views together
      headerView.concat(footerView)
    ))
  ))
This solution works, but isn’t ideal since running combined.runReader returns yet another Reader.
Therefore, in order to get the resulting element out we will have to run the Reader twice!
const ctx = {
  year: 2017,
  author: 'Bob McBob',
  title: 'Awesome App'
}
combined.runReader(ctx).runReader(ctx).fold()
Imagine having to use invoke runReader once for each usage of the context. Such drudgery! Luckily
for us, there is a much better way to do this. We need to add the chain function.
const Reader = computation => ({
  runReader: ctx => computation(ctx),

  map: f => Reader(ctx => f(computation(ctx))),

  chain: f => {
    return Reader(ctx => {
      // Get the result from original computation
      const a = computation(ctx)

      // Now get the result from the computation
      // inside the Reader `f(a)`.
      return f(a).runReader(ctx)
    })
  }
})
The chain function takes in a function f, similar to map. However, f for chain
is a function that takes the result from the previous computation as the input, then
returns another Reader from it. And when the resulting Reader is run, the context will be
passed to all of the chained computations.
This allows us to easily combine the header and footer boxes.
// Takes a view, then returns combined view in a Reader.
const addFooter = other => (
  // Map over the view inside Reader
  footer2.map(footerView => (
    other.concat(footerView)
  ))
)

// We need to use chain here since the result of the function is another Reader.
const combined2 = header.chain(addFooter)
Indeed, we now only need to run the Reader once.
combined2.runReader({
  year: 2017,
  author: 'Bob McBob',
  title: 'Awesome App'
})
A bit of theory: The Reader is now a Monad.
A Monad M must obey the following laws.
- Left identity:
M.of(a).chain(f) === f(a) - Right identity:
m.chain(M.of) === m - Associativity:
m.chain(f).chain(g) === m.chain(x => f(x).chain(g))
The M in our case is the Reader.
We can verify that these laws do indeed hold in this test.
But what is a monad exactly?
You can think of a monad as any object that implements the chain function, and obeys the monad laws.
Note that you may see bind or flatMap being used instead of chain in other libraries or articles. They are usually
the same as chain, and can be treated as aliases. You might also note a similarity between chain and the Promise
then method. They are indeed almost the same. However, in the case of Promises, the computation is not lazy, and has
an immediate effect when constructed, whereas the Reader does nothing until runReader is called.
Why didn’t you just ask?
Let’s define a helper function for our Reader monad.
// When asked, just return the context as the result.
Reader.ask = () => Reader(x => x)
Now, we can start the chain by asking for the context.
const a = Reader
  .ask()
  .chain(x => Reader.of(x + 1))
  .chain(y => Reader.of(y * 2))
  .chain(z => Reader.of(`Got ${z}!`))

a.runReader(1) // 'Got 4!'
a.runReader(0) // 'Got 2!'
a.runReader(-1) // 'Got 0!'
We will also add a helper for this dot-chain sytle of code using generator functions.
// Adapted from https://github.com/DrBoolean/freeky/blob/master/monad.js
const Monad = {
  do: gen => {
    let g = gen() // Will need to re-bind generator when done.
    const step = value => {
      const result = g.next(value)
      if (result.done) {
        g = gen()
        return result.value
      } else {
        return result.value.chain(step)
      }
    }
    return step()
  }
}
The Monad.do function allows us to write “normal-looking” JavaScript code.
const b = Monad.do(function*() {
  const ctx = yield Reader.ask() // This will chain!

  // Now this is just "normal" JS
  const x = ctx + 1
  const y = x * 2
  const z = `Got ${y}!`

  // Return the final value in the chain
  return Reader.of(z)
})

b.runReader(1) // 'Got 4!'
b.runReader(0) // 'Got 2!'
b.runReader(-1) // 'Got 0!'
Assembling all the pieces
Recall that the app from the previous post rendered a message along with some header and footer content.
Let’s use our new friend, the Reader monad, and provide some internationalization (i18n) support for that “Hello ___!” message.
We’ll start by defining a message bundle and a formatMessage function.
import IntlMessageFormat from 'intl-messageformat'

const messages = {
  'en': { hello: 'Hello {name}!' },
  'es': { hello: 'Hola {name}!' },
  'fr': { hello: 'Bonjour {name}!' },
  'zh': { hello: '你好{name}!' }
}

const formatMessage = locale => id => values => {
  return new IntlMessageFormat(messages[locale][id], locale).format(values)
}

formatMessage('fr')('hello')({ name: 'Alice' }) // 'Bonjour Alice!'
Now, we can create context-aware functions using formatMessage.
const formatWithLocale = Monad.do(function*() {
  const { locale } = yield Reader.ask() // Read the locale from context
  return Reader.of(formatMessage(locale))
})

// Formatting "hello" is just applying the `id` 'hello' to `formatWithLocale`.
// Of course, we'll need to wrap 'hello' in a Reader as well.
const formatHello = formatWithLocale.ap(Reader.of('hello')) // <-- Remember this!

// Usage
const f = formatHello.runReader({ locale: 'fr' })
const g = formatHello.runReader({ locale: 'zh' })
const h = formatHello.runReader({ locale: 'es' })

f({ name: 'Alice' }) // 'Bonjour Alice!'
g({ name: 'Alice' }) // '你好Alice!'
h({ name: 'Alice' }) // 'Hola Alice!'
Also, recall our three morpshisms on elements from the last post. We’ll use them in the app as well!
const clap = x => <span>👏 {x} 👏</span>
const uppercase = x => <span style={{ textTransform: 'uppercase' }}>{x}</span>
const emphasize = x => <span style={{ fontStyle: 'italic' }}>{x}</span>
Finally, we can build our entire app as follows.
// New context-aware view for displaying a message.
const message = Reader.of(View(({ message }) => <p>{message}</p>))

const app = Monad.do(function*() {
  // Let's colorize our header shall we?
  // Note: header and withColor were previously defined
  const headerView = yield withColor.ap(header)

  // This will translate our message!
  const sayHello = yield formatHello

  // The message needs to be mapped using the context-aware `sayHello` function.
  const messageView = yield message.map(x =>
    // The `name` prop will be provided when we `fold` the view.
    x.contramap(({ name }) => ({
      message: compose(
        clap,
        emphasize,
        uppercase,
        sayHello // <-- run the function and get a translated message back
      )({ name })
    })
  ))

  const footerView = yield footer2 // Note: footer2 was previously defined)

  // Combine everything together, and we have our app!
  return Reader.of(headerView.concat(messageView).concat(footerView))
})
While we’re at it, let’s crank it up to eleven by styling the app.
// Again, we're mapping over the Reader, then mapping over the View.
const styledApp = app.map(
map(x => (
<div style={{ fontFamily: 'Helvetica', textAlign: 'center' }}>{x}</div>
))
)
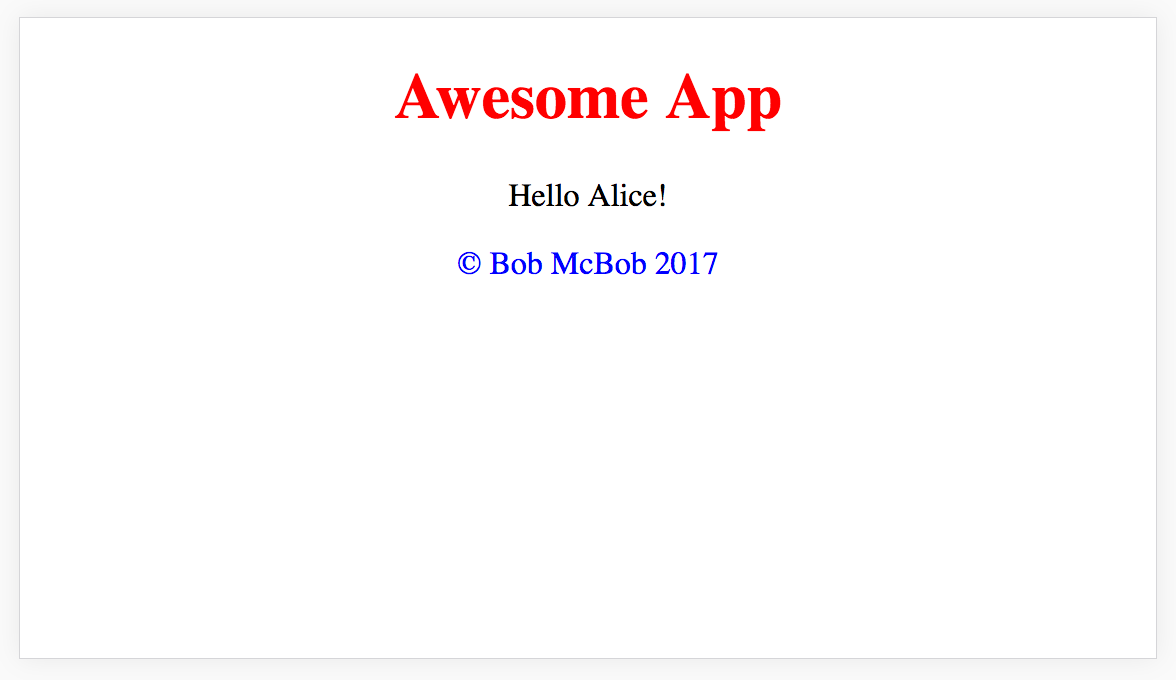
// Now we can render it by providing the context and props.
ReactDOM.render(
styledApp
// Execute reader computation with context.
.runReader({
color: 'green',
locale: 'zh',
title: 'Awesome App',
author: 'Bob McBob',
year: 2017
})
// Pass props to resulting view.
.fold({ name: 'Alice' }),
document.querySelector('#root)
)When we render the app, this will appear on the screen.

The runnable source code for the full example can be found in this repository.
Summary
In this post, we learned about Applicatives and Monads and created the Reader to provide read-only context for our application.
In the next post we will wrap up this series by adding support for stateful computations. So stay tuned!
If you want additional resources on Monads, I recommend these.