Throughout your adventures with Angular, you will undoubtedly come across situations where custom directives make sense. These situations typically involve DOM manipulations, or calling a jQuery plugin.
However, there are other cases where you may not recognize the need to write directives. In this post I will present a problem that will first be solved without custom directives. I will then provide some motivation for creating custom directives. And finally, I will show an implementation for these directives.
In this post we’ll cover:
- When writing a custom directive makes sense.
- Designing directives using a top-down approach.
- Allowing communication with your directives through controllers.
Note: This is a repost from the Nulogy Engineering Blog
Since the introduction of ngMessages and asyncValidators in AngularJS 1.3, I’ve written a new post to cover form validations. The designing process in this post is still valid, but I would recommend using the new AngularJS features to handle error messages and async validations.
The problem at hand
Here is a typical way you may handle form validations in Angular.
HTML:
<form ng-controller="SignUpCtrl as c" name="signupForm" ng-submit="c.signup(user)" novalidate>
  <fieldset>
    <label>Username:</label>
    <input name="username" type="text" ng-model="user.username" required />
    <div ng-show="signupForm.username.$dirty && signupForm.username.$invalid">
      <small class="error" ng-show="signupForm.username.$error.required">
        This field is required
      </small>
    </div>

    <label>Password:</label>
    <input name="password" type="password" ng-model="user.password" required />
    <div ng-show="signupForm.password.$dirty && signupForm.password.$invalid">
      <small class="error" ng-show="signupForm.password.$error.required">
        This field is required
      </small>
    </div>

    <button ng-disabled="signupForm.$invalid">Submit</button>
  </fieldset>
</form>
JavaScript:
m.controller('SignUpCtrl', ['$scope', function($scope) {
  this.signup = function(user) {
    // Calls a service to create the user
    mockUserCreate(user).then(function() {
        // Handle success
      }, function(errors) {
        // Handle failure
    });
  };

  // Simulation of failed user creation
  function mockUserCreate() {
    return $q.reject({username: ['This name is taken']});
  }
}]);
Here, we are showing validation errors when a required field is dirty and missing.
This works pretty well as a starting point, but there are a few problems here:
- Server errors are not reported (say when the username is already taken).
- The error messages are hardcoded within the HTML.
- The HTML cannot be reused by other forms, thus violating the DRY principle.
To show server errors, I can have SignUpCtrl stuff them on the scope, but then I will need to modify my HTML to
display these errors. This doesn’t help reusability of our form behaviour.
Designing with semantics
Let’s step back a bit, ignore Angular forms, and imagine how we actually want to create forms with validation support.
Re-imagined HTML:
<form with-errors name="signUpForm" ng-controller="SignUpCtrl as c" ng-submit="c.signup(c.user)">
  <fieldset>
    <label>Username:</label>
    <input name="username" type="text" ng-model="c.user.username" required />
    <fielderrors for="username"></fielderrors>

    <label>Password:</label>
    <input name="password" type="password" ng-model="c.user.password" required />
    <fielderrors for="password"></fielderrors>

    <button ng-disabled="signUpForm.$invalid">Submit</button>
  </fieldset>
</form>
I switched the original field errors markup with <fielderrors> custom elements, which specify the input fields
they are responsible for. I also added a marker with-errors to the <form> element. This is to create a parent
directive that will broker communication between ngModel validation and the <fielderrors> elements.
This revised markup makes sense from a semantics point of view. A developer reading the HTML should be able to infer what the purposes of the new markers are.
Acceptance criteria
Here are the three acceptance criteria that I can think of so far.
- We want to invalidate an
<input>field and its corresponding<form>when therequiredattribute is violated – Angular has this covered! - We want to display error messages inside
<fielderrors>if the corresponding<input>is invalid. - We want to support adding additional error messages as needed from a controller (e.g. server errors).
Game plan
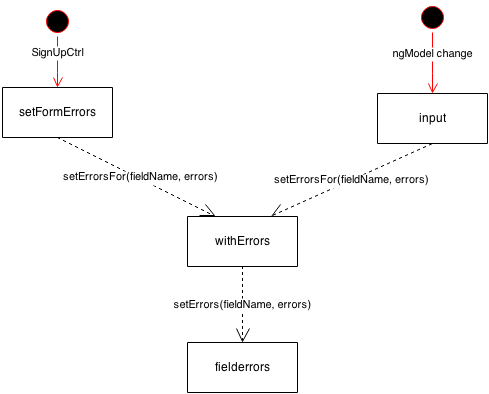
We will create three directives:
- A directive for the
with-errorsmarker that allowsfielderrorcontrollers to register themselves with. - A directive on
<input>elements that will watch for Angular validation errors and set the appropriate field errors via thewith-errorsdirective. - A
fielderrorsdirective that exposes methods for thewith-errorsdirective to set and clear errors. This directive is also responsible to displaying the error messages on itself.
The one piece missing still is the ability to set additional errors from a controller. We have a couple of choices:
- Have
with-errorsorfielderrorswatch for additional errors on their scopes. The downside of this approach is that we will have to add an additional responsiblity to eitherwith-errorsorfielderrorsdirective. - Create a service that we can call from
SignUpCtrlthat will set additional errors for the given form byname.
I’m opting for the latter option because it is much cleaner and it means we can avoid another $watch call.
Putting this all together gives up the following diagram.
Test first
First things first, let’s write our Jasmine tests to make sure our implementation satisfies the requirements.
describe("withErrors", function() {
  var scope, form, input, _setFormErrors;
  beforeEach(inject(function($compile, $rootScope, setFormErrors) {
    scope = $rootScope.$new();
    _setFormErrors = setFormErrors;

    form = $compile(
      '<form with-errors name="testForm">' +
          '<input name="foo" ng-model="foo" value="bar" required />' +
          '<fielderrors for="foo"></fielderrors>' +
      '</form>'
    )(scope);

    input = form.find('input');

    scope.$apply();
  }));

  it('displays form errors', function() {
    input.val('').trigger('input');
    expectErrorsFor(form).toEqual('This field is required');
  });

  it('displays errors set via setFormErrors service', function() {
    _setFormErrors({
      formName: 'testForm',
      fieldErrors: {
        foo: ['foo is bar']
      }
    });
    expectErrorsFor(form).toEqual('foo is bar');
  });

  function expectErrorsFor(form) {
    var errorElement = form.find('.fielderror');
    expect(errorElement.length).toEqual(1);
    return expect(errorElement.text().trim());
  }
})
Implementing the setFormErrors service
We start with our setFormErrors service, which allows the withErrors directive to register themselves with.
The exposed service function will set field errors for a given form name.
m.factory('setFormErrors', function() {
  // Registered withErrors controllers
  var withErrorCtrls = {};

  // The exposed service
  var setFormErrors = function(opts) {
    var fieldErrors = opts.fieldErrors;
    var ctrl = withErrorCtrls[opts.formName];

    Object.keys(fieldErrors).forEach(function(fieldName) {
      ctrl.setErrorsFor(fieldName, fieldErrors[fieldName]);
    });
  };

  // Registers withErrors controller by form name (for internal use)
  setFormErrors._register = function(formName, ctrl) {
    withErrorCtrls[formName] = ctrl;
  };

  return setFormErrors;
});
Implementing the withErrors directive
The withErrors directive controller allows fielderror controllers to register themselves with. It also registers
itself with the setFormErrors service so additional errors can be set without Angular validations.
Lastly, it provides two methods for the input directive to call whenever it encounters an Angular validation error.
m.directive('withErrors', ['setFormErrors', function(setFormErrors) {
  return {
    restrict: 'A',
    require: 'withErrors',
    controller: ['$scope', '$element', function($scope, $element) {
      var controls = {};

      this.addControl = function(fieldName, ctrl) {
        controls[fieldName] = ctrl;
      };

      this.setErrorsFor = function(fieldName, errors) {
        if (!(fieldName in controls)) return;
        return controls[fieldName].setErrors(errors);
      };

      this.clearErrorsFor = function(fieldName, errors) {
        if (!(fieldName in controls)) return;
        return controls[fieldName].clearErrors(errors);
      };
    }],
    link: function(scope, element, attrs, ctrl) {
      // Make this form controller accessible to setFormErrors service
      setFormErrors._register(attrs.name, ctrl);
    }
  };
}]);
Implementing the input directive
The input directive requires the ngModel and withErrors directive controllers. If they are both present, then
it will listen for any errors on ngModel, map those errors to messages, and set those messages using the withErrors
controller.
m.directive('input', function() {
  return {
    restrict: 'E',
    require: ['?ngModel', '?^withErrors'],
    scope: true,
    link: function(scope, element, attrs, ctrls) {
      var ngModelCtrl = ctrls[0];
      var withErrorsCtrl = ctrls[1];
      var fieldName = attrs.name;

      if (!ngModelCtrl || !withErrorsCtrl) return;

      // Watch for model changes and set errors if any
      scope.$watch(attrs.ngModel, function() {
        if (ngModelCtrl.$dirty && ngModelCtrl.$invalid) {
          withErrorsCtrl.setErrorsFor(fieldName, errorMessagesFor(ngModelCtrl));
        } else if (ngModelCtrl.$valid) {
          withErrorsCtrl.clearErrorsFor(fieldName);
        }
      });

      // Mapping Angular validation errors to a message
      var errorMessages = {
        required: 'This field is required',
        pattern: 'This field does not match pattern',
        minlength: 'This field is too long',
        maxlength: 'This field is too short'
        // etc.
      };

      function errorMessagesFor(ngModelCtrl) {
        return Object.keys(ngModelCtrl.$error).
          map(function(key) {
            if (ngModelCtrl.$error[key]) return errorMessages[key];
            else return null;
          }).
          filter(function(msg) {
            return msg !== null;
          });
      }
    }
  }
});
Implementing the fielderrors directive
Finally, the fielderrors directive requires a parent withErrors directive controller which it registers itself
with. It also provides methods for setting and clearing errors.
m.directive('fielderrors', function() {
  return {
    restrict: 'E',
    replace: true,
    scope: true,
    require: ['fielderrors', '^withErrors'],
    template:
      '<div ng-repeat="error in errors">' +
        '<small class="error"></small>' +
      '</div>',
    controller: ['$scope', function($scope) {
      $scope.errors = [];
      this.setErrors = function(errors) {
        $scope.errors = errors;
      };
      this.clearErrors = function() {
        $scope.errors = [];
      };
    }],
    link: function(scope, element, attrs, ctrls) {
      var fieldErrorsCtrl = ctrls[0];
      var withErrorsCtrl = ctrls[1];
      withErrorsCtrl.addControl(attrs.for, fieldErrorsCtrl);
    }
  };
});
Wiring up the controller
Now, our controller may pass additional errors to the fielderrors directive by calling the setFormErrors service.
m.controller('SignUpCtrl', [
  '$scope', '$q', 'setFormErrors',
  function($scope, $q, setFormErrors) {
    var serverErrors = this.serverErrors = {};

    $scope.signup = function(user) {
      fakeUserCreate(user).then(function() {
        // Success
      }, function(errors) {
        // Failed
        setFormErrors({
          formName: 'signUpForm',
          fieldErrors: errors
        });
      });
    };

    function fakeUserCreate() {
      return $q.reject({username: ['This username is taken']});
    }
  }
]);
Try it
Wrap-up
In this post we went through a discovery process for a component in our application that we would like to generalize and reuse. We started with a high-level design and gathered the acceptance criteria for our component. From our acceptance criteria, we wrote our tests and finally implemented the component to satisfy those tests.
In reality, there’s a lot of back and forth between design and implementation. This is the way it should be! What I am proposing is for developers to think top-level design first and implementation second.